Monday, January 31, 2011

This Book Page Wreath Is A Literary Genius

I kept seeing these wreaths, look here, here, and here, all over the internet and darn it I wanted in! They reminded me of all these Jane Austin movies I like to watch. They’re just so romantic looking! *Swoon* So, I set out to find some tutorials on the subject of paper wreaths. There were about one billion tutorials out there! LOL I’m great with numbers. ; ) Anywho, I got the breadth and depth of these tutorials and through just plain laziness and hardheadedness watching them I was able to help myself come up with a system that worked for me. (truthfully, I didn’t have staples left and so I had to do it the hard and sticky way- using glue)

I took an old literature book that was ready for Goodwill and sadly (I’m a book junky!) tore the pages out of it. My wreath has excerpts from Pride and Prejudice, War and Peace, The Great Gatsby, etc. Don’t feel bad, they were just a collection of story excerpts from an anthology and the word “anthology” is quickly become a curse word in the educational system. (that’s how I rationalize the destruction of books because I’m a BOOK JUNKY!) So as I was saying, I took the pages out and rolled each page into a funnel. These funnels would normally be stapled at the bottom; this would be the easy way. My way involved the use of Modge Podge and extremely sticky fingers. I suggest you use staples. I cursed a lot during this process!

Look Ma no staples.

After about one trillion funnels, you are ready to begin assembling a wreath. Oh I forgot to tell you what you will need as a base. I basically took a piece of cardboard and cut out a circle about eight inches in diameter. This cardboard circle is what you will use to glue all your funnels onto.

I'll be using the leftover carcass of this book for another project.

Basically, you go around the perimeter of the cardboard base and attach these funnels with glue. I flattened the bottoms a bit to make them adhere better. You just continue gluing and spacing them evenly all the way around until you are done with that level. Then, you move onto the inner level doing the same thing as before only staggered lower so the first layer of funnels is exposed. You can continue doing this as long as your patience holds up. Mine didn’t so I cut things short and left a bald spot in the center. I had other plans for this bald spot. (I think I need to work on patience this year.)

I measured the middle of the wreath and found the diameter to be about four inches, so I cut a four inch circle from some pretty scrapbooking paper I had on hand. Then I wanted to add a Valentine message in the center of that, so I went to my Silhouette (we have a complex relationship her and I) and using a font that I thought looked romantic, I cut out the word “love”.* I glued this onto the pretty scrapbooking paper circle and the wreath was done. So easy; right?


Mama likes.

It looked so swoon worthy that I decided to hang it over my living room mirror from this post. I just love how it looks and the cost of it (free) works for me.


My little heart goes pitter patter!

The best thing about these little wreaths is the versatility. They can be used for any holiday even Father’s Day! (I’m thinking newspaper print, golf scrapbooking paper, argyle patterns, little paper tools, you get the idea.)


*I typed the word love and then I had to use the weld option on the Silhouette. If you don’t weld the letters together, the machine will cut each letter individually.

I urge you to go forth and try to make one. Get your kids to make the funnels! They’ll think they’re having fun. They don’t have to know they’re doing your dirty work.


Nydia 8)

I've linked this over here:

The Shabby Chic Cottage


Friday, January 28, 2011

My 101 in 1001 List of Goals

As I mentioned here, a year ago I created a list of goals I wanted to accomplish within 3 years-hence 1001. This list was inspired by a few other lists I saw out there in blogdom.  I wanted to make changes to add quality to my life.  There wasn't anything terribly wrong but it could have been better.  I guess you could say I wasn't really paying attention.  I wanted something I could look back on and say, "Wow I did these things!"  It began around the same time that everyone else was making resolutions and we all know how those go.  Thus was birthed my 101 in 1001.  I recommend it highly and a few others who have followed suit have managed to accomplish some pretty awesome things.  Here's my list:

My 101 in 1001.

Goal completion date Jan 6, 2013

1.swim under a waterfall (who wouldn't like to do that?)
2. celebrate new years in style (instead of on the couch like a scaredy cat-drunk drivers)
3. visit disney (my kids aren't really that into this-shocker!)
4. be and stay completely debt free (i hate paying interest-I love Dave Ramsey)
5. own a SUV (i drive a paid for Volkswagon.  i need something nicer.  i need to save)
6. send a kid to college (my daughter)
7. make money that doesn’t require me to work for it(completed 11/1/10 found $41)
8. learn to do something completely new(completed 11/01/10 refinish furniture)
9. see a broadway play in New York!
10. exercise routinely at least 2 times per week (completed)
11. finish master’s degree (I'm on the fence about this one since teacher's are so under paid even with a master's it might not be worth the investment)
12. save $10000 cash. (part of that emergency fund Dave Ramsey talks about)
13. take another cruise
14. celebrate my moms 60th birthday in style
15. read 50 books (4/50) (Call of the Wild, Alice in Wonderland, A Letter to my Daughter, Stuff White People Like)
16. make 1000 on ebay
17. own an expensive handbag (i cringe at the prices)
18. own an expensive watch (who wears a watch anymore?)
19. go see a pro game live with kids
20. go camping (not my cup of tea but i think the kids would love to see me suffer)
21. run the entire length of my block (i can't even run the length of my driveway!)
22. learn to knit (good enough for a hat, some mittens, and some socks)
23. start a collection and amass at least 20 of those items (4/20) ( i collect straw hats - go figure)
24. make someone’s Christmas special
25. cook one new recipe a month (4/36)
26. keep my house cleaner (completed - we developed a plan i will discuss that in a future post)
27. finish hardwood floors (completed 7-2010)
28. redo cement around pool
 29. change my hair drastically
30. win something
31. eat somewhere exclusive (like The Four Seasons or Twenty One etc)
32. eat vegetables for a week
33. travel somewhere I’ve never been (has to be new country or island etc)
34. get botox
35. reduce my carbon footprint (complete - i've changed some habits permanently)
36. be at my goal weight of 106 (complete - happened briefly but hey that still counts)
37. make a new friend (this is a tough one for me)
38. get my whole house decorated and painted
39. take a road trip (8-13-10)
40. have a Martha stewart ish dinner party
41. clean the windows
42. visit a museum (done 5/1/10)
43. send my nephew and nieces letters in the mail (0/9) (these kids are hard to love- i'm not joking)
44. try Indian food
45. go to new york during Christmas
46. visit with old friends in Massachussetts (8-13-10)
47. see my sister odalys
48. create a work of art (complete 1-11-11)
49. connect with 100 friends on facebook (Completed 4-22-10)
50. go for three different weeks without buying anything (1/3)
51. see a movie at Imax
52. get a passport
53. give a bottle of wine, some cheese and fancy crackers to moms recluse neighbor
54. build a snowman (this one's a challenge since I HATE being cold!)
55. send thank you notes for small unexpected reasons (0/30)
56. sew an item of clothing (complete 1-23-11)
57. attend a formal event
58. let my nephew sleepover(5-15-10)
59. make a piece of jewelry (8-26-10)
60. enter wine in a competition (more about this in a later post)
61. take a dance class again
62. become cpr certified
63. visit a new state
 64. go apple picking
65. make a birthday cake for someone(7-18-10)
66. swim with dolphins
67. Take 101 pictures of things that make me happy (15/101)
68. take a ride on a train
69. eat at 15 new restaurants (5/15) Panico's, daves BBQ, max's BBQ, Dynasty, Terra Nuova, California Pizza Kitchen)
70. take 30 bike rides (4/30)
71. finish my will and living will
72. own another house
73. start diaries for my kids to read in the future (i am thinking about letting this blog and facebook count as this because writing into a journal sucks!)
74. learn about a new religion
75. start a garden of things we will eat
76. create a photo album for my mom of her mom
77. submit davids video to America’s funniest home videos ( i am in possesion of the most hilarious video!)
78. watch 101 new movies (8/101) (How to Train your Dragon, Donnie darko, waking life, breakfast at tiffany's, The Blind Side, Avatar, despicable me. Funny People, red eye, Cocktails)
79. organize photos by buying a scanner and create photo books
80. donate 10 dollars for every item not complete to a needy family
81. work out 3 times a week for one whole month take a before and after pic (completed this summer- i lost 13 lbs and looked fab then the holidays came.  i might do this one again)
82. buy a really good camera - by my standards good (6/16/10)
83. learn how to use the really good camera
84. go fishing
85. get espresso machine fixed (completed)
86. replace bathroom window(6/23/10)
87. plant a tree in honor of my grandmother
88. open another savings/investment account and contribute to it automatically
89. take a picture of myself everyday for a year (just to see how i age)
90. take my MATs
91. host a themed party
92. get braces for me
93. get braces for nat
94. have my wisdom tooth removed (major overcoming of fear here)
95. finish my weekly to do list completely for once
96. build a sand castle
97. make white wine
98. detail my car
99. keep my car clean for a whole month
100. start a website (completed 12-26-10 - my blog counts )
101. build a pergola

There you have it folks.  I've completed quite a few things and I've even had volunteers help me with some.  Give it a try and if you do please keep me posted of your progress.  Stay happy friends! 

Thursday, January 27, 2011

Ugly Exercise Bike Makeover

I know it's no secret that January is resolution month. It's the time of year when most of us resolve to get healthier. There's no shame in that! Here's the problem; most of us begin with a gusto and then lose the wind beneath our wings. In the meantime our love handles become about as subtle as a flying brick. I mean come on my "love" handles are now my "hate" handles. You know what I mean?


Well last year I chose to do something different; gone are the days of resolutions; gone are the empty promises I made and the disappointed glances I got as I shoveled pie and stuffing -at the same time- into my mouth. I decided instead to go with a 101 in 1001, let me explain. I made a list of 101 goals to accomplish in 1001 days. January 6th made one year since I began this quest and I've managed to check off quite a few things. Best of all, the list is for me and no one else. I'll speak more on the subject at a later post.


Now to my point; that nasty brick wall you hit when your motivation runs out. I hit that wall too. Sure I started out great! I begged my husband for an exercise bike. I told him it would get so much use. I coaxed him with swimsuit pictures; sure they were from Victoria's Secret but the man can dream. (Do men actually think that exercise is all it takes to look like that? LOL)


He knew me well though and told me to find a bike that was used so I wouldn't kick myself for blowing hard earned money on a whim. After weeks of looking on Craig's List with no luck, my neighbor put a bike on the curb for garbage day. JOY!! I hit paydirt! I made my hubby drag that road kill home to me and I rode that sucker -the bike- every day! (for like a week) Then I was over it; just like that.


Gee I wonder why this beauty was thrown out?


I try to rationalize it, but the truth is I lost my mojo. Winter made me want to hibernate. Now this bike was just sitting there mocking me, so was my husband by the way. My garbage picked bike was now a stand for my clothes. I got tired of being laughed at - I have a mean family-, so I decided to do something about it. I gave my ugly bike a makeover!


Naked cushion on the floor after the removal of infinity staples.  Seriously, there's no higher number than the amount of staples I removed from this thing. 

Pretty pleathered piece- try saying that three times fast- after the addition of infinity to the second power staples.  Ok maybe a slight exageration, but definitely at least 1000!


It's so much cuter now! Maybe, just maybe, its cuteness will inspire me to use it more often. In the interim though, I'm joining pilates. Sexy body here I come!


Sooo Cauuute!


Just so you know, while I worked, I sang Olivia Newton John's "Let's get physical". It's an anthem for all things work-out related.


Nydia 8)


Wednesday, January 26, 2011

My Lovely Valentine Wall Art

Love is in the air! So is decluttering. I decided to combine the two. I took an old frame that I found at Goodwill for $2.50. It clearly came from a nursery. This thing was just taking up space in my house and I didn't just want to throw it out.  I decided to paint the frame and create a Valentine wall decor thing out of it.  I painted the frame using oil rubbed bronze spray paint-loooovvveee iiittt!


Next, I took out the frame's backing and covered that with some white basket weaved type fabric that I also had lying around.  This gave me a nice textured surface to work upon. 


While the mat dried, I took out my handy dandy Silhouette machine and cut out my phrase and my LOVE cutouts.  I used some scrap cardstock that matched the matting and frame colors.  I glued my phrase cutout onto a scrapbook mat page and I set all of this over another piece of scrap cardstock.  This gave me a little bit of brown bordering around the whole center part.  It looked rather plain at this stage so I went back to my Silhouette and cut out some curly Qs - at least that's what I know them as.  These I stuck at the corners.  Last and finally, I glued all of these cutouts onto the fabric matting and Ta da - Valentine art!


I love this sooo much!  Such great use of would be garbage!  I'm a legend in my own mind!


Nydia 8)


I'm linking this here nonsense over at:


Beyond The Picket Fence
giveaways

Tuesday, January 25, 2011

A Ruffled Scarf That Won't Ruffle Your Feathers

I don't know what the weather is like in your neck of the woods, but in my neck of the woods it's freezing!  I'm talking, polar bear sexy party, cold! 


Being warm matters to me more than being cute these days and after seeing the forecast this week, I figured frumpy is here to stay for a bit longer than I thought.  I can't have that.  So I decided to combine cute and warm with this spectacular scarf idea that I got from Make It and Love It.  Go check it out.  It's so gorgeous!

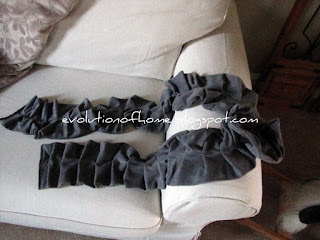
I took her basic idea and tweeked it a little based on my laziness ability level.  So, I took $2.62 worth of fabric scrap and cut that in half to make two long foldable strips.  I attached these to make one long continuous piece of fabric. 

I folded the fabric and sewed a seam on the wrong side- like when you make a pillow casing.  Next step was to turn it inside out and sew the end seams.  At this point it looked like a giant sausage casing.  Yum...meat!

Can you tell I like gray? 


I took this long tube and folded it every 2 inches or so to create a pleat.  I stuck a pin in each pleat and after about one billion pins-true story, I had a scarf length I liked. 

I took this whole mess pre-scarf over to my sewing machine and sewed one giant line down the middle taking out the pins as I went. 

Careful picking this sucker up! 


The whole scarf, from start to finish, took about 20 minutes to make.  Best of all this was an extremely easy sewing project and trust me when I tell you that I can't engineer myself out of a paper bag!  I love my new scarf and I was even thinking of making it as gifts. 

I love you.  Yes I do.


Just so you know; my scarf is similar to the inspiration scarf but completely different at the same time.  Next time I will try the inspiration method. 

Stay warm and sexy friends!

Nydia 8) 

Monday, January 24, 2011

This Faux Mercury Glass Is Outta This World

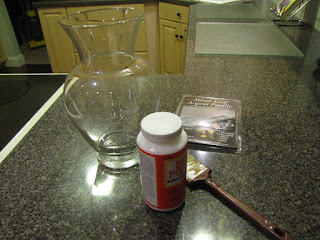
Mercury glass has made a huge comeback; certainly bigger than Whitney’s!  ;)  It's all over the media like a misbehaving diva!   I for one really like the look of it.  Mercury glass reminds me of cozy winters for some reason.  I wanted to try my hand at making some and I found a few sources each demonstrating a different method.  Martha Stewart Living had a feature on Faux Mercury glass that gave instructions using water and looking glass paint.  On some random blogs, I saw looking glass paint and alcohol being used.  This was my method of choice but finding looking glass paint proved to be impossible in my area.  All the craft stores told me they had taken it off their shelves!  Hmmm… I wonder why?   Anyway, since I couldn’t find the paint, I had to go with the more complex way of making faux Mercury glass.  This method involved Modge Podge and silver leaf.
Here's my supplies.

First, I spread a thin coat of Modge Podge on the inside of the pieces I wanted to “faux up” - LOL this sounds like a swear word.   Then, I cut small squares of silver leaf and pasted these on the sides of the glass.  I continued doing this until the whole inside of the thing was covered.  After I had a sufficient amount of silver leaf, I took a dry paper towel and rubbed the inside lightly to expose some of the glass.  Tha tha that’s all folks!
Add the silver leaf to the thin layer of Modge Podge.


This cost about $5.00 with plenty of materials left over.


This project was not difficult.  It was, however, MESSY!  Silver leaf can be hard to work with and sticky fingers don’t make it easier.  Major handwashing here!


My advice, if you want to try this project yourself, is try to track down some looking glass paint, even if it comes from a guy who knows a guy.


Nydia 8)

Beyond The Picket Fence

Friday, January 21, 2011

Fly Little Butterfy Pillow Fly

Pottery Barn makes the most gorgeous things!  Don't you agree?!  I'm head over heels for their butterfly pillows.  Only one problem is they're $49 and you still need an insert.  Ain't happenin here.  I have to send a kid to college in a year!  You know what I mean? Still I'm a crafty person so I figured I'd try my hand at making one. 

I went to the fabric store and bought a half yard of cotton fabric.  It had little flecks in it that gave it a "natural" look.  While I understand that the Pottery Barn version was made on a much finer upholstery type fabric, I wasn't willing to part with much money.  So this remnant piece had to do.  Also, I should point out that the day before I had bought a bag of polyfil at the thrift store for a buck!  This meant I wasn't about to buy a pillow form.  I was going to make one!  JOY! 

So I took like ten minutes to sew a pillow form.  I used the same fabric I bought for the pillow.  I made sure to stuff it really good.  The last thing I need is a lumpy couch pillow. 

Next, I went online and looked at several pictures of butterflies until I found one that was fairly easy to draw.  I made my daughter draw one that I could trace but I ended up eyeballing the butterfly and drawing it myself.  I went over the pencil outline with a fabric marker then filled in the colors I wanted with a combination of fabric markers and acrylic paint pens. 

Last, I sewed the actual pillow case and stuffed it with the pillow form. 

Here's the beautiful Pottery Barn pillow.  Isn't she gorgeous?!  Notice the quality of the fabric.


Here's my drawing on the pillow fabric. 


Here's the finished pillow. 


My version of a butterfly pillow. 


Pottery Barn- $49 plus cost of pillow form.  My version- $3 for fabric and stuffing.  Markers and paint were on hand from other projects.  Best of all I still have fabric left to make another pillow!  Yeah me!


Nydia 8)


I'm linking this here nonsense over at these parties:
Tatertots and Jello: Weekend Wrap Up
Beyond The Picket Fence

Thursday, January 20, 2011

Don't Throw Out The Floral Arrangement With The Bathwater

I don't know what came over me?  Have you ever bought something at a thrift store simply because it was cheap?  That happens to me when ever I go in to Goodwill.  My eyes just fill with joy at all the cheap potential and I grab everything I see!  My sister usually acts as the voice of reason and convinces me to put some of the junk back.  Trust me people, without my sister I would be the next featured on Hoarders!

Well on one Goodwill trip my sister was unable to make it and so I brought my daughter along.  She's powerless against me and so I came home with more crap than anyone could possibly need.  That's ok though because as punishment I grounded myself from going back until I put everything I bought to use. 

One of the things I found was this uggo thing:

What the HECK was I thinking?! What's up with the tulips drooping down the side? 

When I saw this, I knew I liked the container.  It reminded me of an antique pitcher.  I think I saw something like it in a Ballard Design catalog or something.  Anyway my point is I was going to throw out the flowers.  But then I came up with a better solution; make a floral arrangement. 

I got the idea from a Lifestyle magazine article I read years ago.  It was about the floral arrangements of the stars.  In it was this square glass vase with low flowers and a long leaf wrapped inside.  I fell in LURVE! 

Here's how I went about making a copy on the cheap:

Flowers on death row. 


Purchased leaf for $4.00.


Wound that leaf inside this $1.00 Goodwill vase.


Flowers on the cheap.  I think they're cute!  Sorry about the awful night picture.


So, the moral of the story is: I'm always right!  So let me buy all the junk I want!!!!


Nydia 8)

Wednesday, January 19, 2011

"Can" I Please Use You For Storage

Remember that can of soda crackers I showed you here, well I finally finished remodeling it.  Who doesn't need extra storage?  I know I'm always on the lookout for interesting, decorative ways to store my junk.  This is not just another container.  It's prettified!  No one has to know it was a can of soda crackers.  Best of all it's one less thing that ends up in the trash.  Win, win. 


 Here's the before of the offending can. 


 Here it is covered in some type of rayon fabric remnant. 


Here's the final product after the addition of some scrap ribbon and a stenciled monogram.  Not too bad if I say so myself. 


I have enough cans to make a thousand of these!  I really like crackers!  I'm a cracker freak!

Nydia 8)

I'm linking this here nonsense over at these parties:

Tuesday, January 18, 2011

Mirror Mirror On The Wall

I have a confession to make.  I was a Ballard Design virgin up until this summer.  I received a catalog in error.  Shhh... don't tell my neighbor.  She thinks it got lost in the mail.  As I thumbed through the pages, I became more and more enamoured with the gorgeous antique-like mirrors they were pandering.  I use the term pandering because let's face it these types of stores profit from our vices-the constant need to make our homes into show places.  Off the soap box now.  Moving on... I too wanted a fancy antiquey (word?) mirror for my home but alas I had no gold doubloons.  This lass needed to come up with a plan.  Off to Goodwill I went.  Tra-la-la. 

I knew the type of mirror I needed had to be ornate and rather large.  The Goodwill gods must have been shining down on me that day because as I passed the ladies pajamas and intimates(ewww) section, I came across a rather large, moderately ornate mirror that called out my name.  It said, "Nydia child if you leave me here to rot you'll never forgive yourself."  Because I am a good girl who listens to the voices, I lifted that heavy creature and trudged over to the register.  It was HEAVY!  I handed fifteen crumpled dollars to the lady at the register who always looks at me funny.  She just doesn't get me.  I understand.  Nothing personal. 

Ok this story is going the distance, time to wrap it up.  So I got the mirror home, threw it on the grass and proceed to give it a makeunder.  First I primed it and spray painted it an antique white color.  As such:


Then, I took some left over walnut stain and spread some on and wiped it off.  I did this so that the little details would be emphasized.  I recommend using a glazing medium.  I was too cheap to spend any more money on this and too lazy to run down to the Home Depot for some glaze.  Either way the mirror ended up just like I had anticipated.  Score one for the home team!  Here's the mirror hanging in my ever evolving livingroom.  


*My son asked me why I made the mirror dirty.  LOL Boys!


Nydia 8)


HOG

LinkWithin

Related Posts Plugin for WordPress, Blogger...