Monday, October 31, 2011

My Halloween House

  Well guys, I thought I'd show you a few things I did to decorate my home this Halloween.  All of the decor was done really cheaply.  Here are some of the things I did. 

I made this Halloween candelabra.  I show how to do it here.

This is how I decorated my foyer.

Remember this cabinet from this post?  Well, I added some Halloweeny touches there too.

A few dollar store items made this little vignette.  This is basically $2 worth of materials. 

I got the fake hand for like $2 last year.  The glass is fake from the dollar store and the flask is actually mine.  Don't judge!

To make this vignette, I took a creepy print I found online and painted spooky eyeballs onto it.  Then I photocopied a school picture of my son and made that spooky.  I added some fake broken glass, a plastic cauldron that I've owned forever, a skull that I've also had forever, and some branches from my yard.  The eyeball in the skull is actually a bouncy ball that my son plays with.  The crow is from the dollar store. 

Don't worry this is just a black and white copy of my son's school picture.  I added vampire teeth, red eyes, silver hair, and pointy ears with paint markers.  You can easily add spookiness to your home this way.

Adding crows and cheap skulls around the house is also an easy way to make it more Halloweenish on the cheap. 


These chair covers were from the Christmas Tree Shops last year.  They were about $3 a piece but you could easily make some of your own.

I set out a bowl of glittery skulls and placed a dollar store crow on them.  I bought about 20 of these little crows and placed them all over the house.


This candelabra is just a Goodwill find that I spray painted black.  It cost a $1.  Just add some fake cobwebs and spiders and you're good to go. 

Spooky, isn't she?  I swear everytime I see it, it scares me.  Basically all she is a wig form that I painted, a wig, some pillows and a blanket.  She really creeps me out. 

Some of the food I put out for my party. Of course it was all Halloween themed. 

Happy Halloween Folks!

Nydia 8)


Sunday, October 30, 2011

Abracadabra It's A Halloween Candelabra

Last year, before I started this blog, I spotted a Halloween candelabra at Home Goods.  It was so neat, that I had to take a picture of it.  I didn't buy it because it seemed easy to replicate and besides it wasn't exactly free.  I already had everything I needed to make it on hand, so I decided to give it a try. 

This is the inspirational piece.  Very plain but I loved how the hand wraps around it. I think it cost like $20. 


I had this candelabra that I use every Halloween.  Notice the red candle drippings from my "bloody" candles.


 Now, since I made this before I started this blog, I don't really have pictures to show you the exact process, but I can walk you through it. 

First, I scraped off as much candle wax as I could.  Lol!  I'm just kidding I spray painted right over it with a can of left over black paint.  What do I look like-a perfectionist?

The skeleton hand came from a bag of skeleton parts that I usually scatter over the front of my makeshift graveyard.  No one is going to miss it.  So I took that hand and spray painted it in shiny silver.  Then, I used my glue gun to attach it to the candelabra.  The bloody candles were made by painting the natural candle drippings with red paint. 


I love this now.  I think I even like it better than the one from the store.  And guess what?  This one was free and made from crap that I was totally over.  Yea viva Halloween!


Nydia 8)

Saturday, October 29, 2011

Quick and Cheap Halloween Wreath

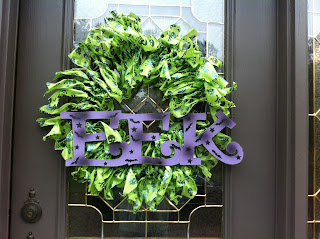
I had a grody grapevine wreath form that I was throwing out last year around Christmas and as I put it into the garbage, I realized how wasteful it was to just toss it.  I decided it was too blah for a Christmas wreath, so it became a Halloween wreath instead.


So, basically all I did was spray paint the form black.  I had some Halloween wired ribbon that I found at a deep discount at AC Moore around Thanksgiving time.  Don't you just love it when you find the holiday decor at 75 to 90 percent off?  I think I paid like $1.50 for two spools. 


I cut the wired ribbon into strips and tied the strips around the form.  That's it. 

Oh but wait, that's not it!  I took a sign that I paid 75 cents for and wired that puppy on to it.  By the way the sign was also at a deep discount.  Score!!!! Now that's it.  

I hung it on the door as such. 


If you are interested in the mummy check out this post on how to make it. 

So I got a totally original Halloween wreath for $2.25.  Hold your applause people, Nydia has left the building. 

Nydia 8)

Friday, October 28, 2011

Halloween DIY Weather Proof Mummy

I want to show you a cheap way to make a really cool Halloween prop. 

Last Halloween, before I started this blog, I made a life size mummy. 

I love this stupid thing!


Now that I have a captive audience, I'll reveal the magic behind making one of these.  They're actually quite simple and fun to make. 

Here's your supply list:
silver duct tape
white duct tape
a wig form (optional)
old clothes
Something to weigh down your creation (I used sand.)
Newspapers to stuff it with
A willing participant (or in my case, not so willing)


Here's how to put it together:

Step 1. Nab somebody.  Just kidding.  Find a volunteer.  It's legal that way.  I guilted my daughter into it.  

Step 2. Dress them in old clothes that are too large for them.  (This way the tape doesn't stick to their skin.)

Step 3. Wrap this person in cheap silver duct tape.  Do this completely and one section at a time.  For example- do the bottom half of the body then have them slip out of the mold.  Then do the top half of the body and cut the mold off down the back.  You can have them pose their arms in any mummy position. 


She's just so interested in mom's creativity.

Step 4.  Weigh down the mummy feet with sand so it will stand up on its own.  Stuff the bottom portion of the mummy body with light materials such as newspaper.  Attach the top part to the bottom part and continue to stuff it.  Be sure to tape up the back too.  Carefully stuff the arms so they don't lose their shape.  Be sure to leave the neck area open. 

Step 5. Place your wig form into the mummy neck and tape over it to attach it. 

Shaping the arms.

Step 6. Once you've built a solid form, your next step is to cover the whole thing in white duct tape.  Go over the entire body making sure to leave no spots exposed.  This is especially true if you plan on putting it outside like I did. 

Step 7. This is totally optional but it you have guaze or creepy cloth or even cheese cloth, you can go ahead and wrap your mummy up in that too.  This will give it a look of authenticity. 


I hope you give this one a try.  It's a neat project to do with your kids and a great way to reuse all the newspapers piling up in the recycling bin. 


Nydia 8)

Thursday, October 6, 2011

Halloween Toe Tag Invitations

This year I’ve decided to try my hand at hosting a Halloween party.  As if I don’t have enough to do already!  I swear I’m my own worst enemy.
Many of the things for the party were made by me and so I’ve decided to post them here so you too can go forth and get in over your head.  As a result of this venture, I will be posting Halloweeny crafts and creations over the next three weeks leading up to Halloween. 
Every good party needs party people, right?  And how do you get people to gather peacefully in celebration? Why you send invitations, of course!  I wanted some that were real attention grabbers.  You know, invites that say, “get here or else!”  All joking aside, all I want to do is feed and entertain people.  Is that too much to ask for?
Martha Stewart makes these really cute invites that are actually fake fingers in a box with a note attached that states the party info.  Super cute!  I can’t argue with that.  While I could’ve totally gone with that concept, I wanted to be cheap and overcomplicate things.  This is where I went ahead and make my own twisted variety of invite.  I went with a morgue toe tag concept.


Here’s what you’ll need:
·         Polymer clay in your choice of death colors.  Also white or bone marrow colored.
·         Aluminum foil
·         A tool for smoothing out clay.  I just used a round pencil.
·         A pasta machine for making thin sheets of clay.  This is optional because you can just roll it out.  I just happened to have a pasta machine.
·         A baking sheet
·         Some large blank gift tags found in the wedding or paper crafts section of a craft store.
·         A printer for printing spooky images (optional)
·         Red paint or ink for adding bloodiness.
·         Rubber bands
Step 1- Make a large toe form using balled up foil.

Step 2- Flatten the clay and use this to cover the foil form.  I used white clay to create the bone part.

Step 3- Smooth out the clay.  Cut a square piece to make the nail.  Add little details that a toe would have. 

Step 4- Bake according to package directions.
Step 5- Paint blood spots onto the toe wherever you like.
Step 6- Using your neatest handwriting create spaces for the party info.  Add details like a toe tag would have such as the county you live in etc.  I hand printed and then made copies of the original.  You could type it all up if you like.


Step 7- To decorate the other side, I used clip art.  A city morgue seal would’ve been great but I couldn’t find one. 

Step 8- I filled in the party info with a red pen.  Then, I covered the invites in bloody finger prints.

(I would show you a picture but then you would all know my address and I might end up having to feed you.)
Step 9- Attach the tag to the toe by using a rubber band. 

You now have a severed toe tag invite!  My cost for 15 invitations was $5.74 with plenty of materials left over. 
Nydia 8)

LinkWithin

Related Posts Plugin for WordPress, Blogger...