Wednesday, May 25, 2011

How to Properly Repair Holes in Jeans

I tend to make a short story, long so I'll keep this one simple.  I have a little boy that I like to call Sun.  He is one of my everythings.  He is also a very active little boy.  His favorite activities involve skinned knees and holes.  So recently I was cruising the NET and came across a picture of this.  It's in another language but it's easy to figure out.  I found it so adorable!  I had to make it.  It was so easy to do.  Here's how. 

Isn't this the cutest?!

Step 1- Find a pair of jeans that has a hole in it.  If you have a boy then you probably have a closet full. 

Step 2- Cut your felt.  You will need red and white.  Use the white to make two circles, one bigger than the other and then cut some teeth.  Make sure they fit in the hole.  Cut an oval slightly bigger than the hole you need to repair.  This will be the inside of the mouth.


Step 3- Place the teeth over the red felt and quickly stitch them together.  Place this on the inside of the hole and stitch around it with some black embroidery floss.

Step 4- Attach the eyes and use the embroidery floss to create a "look".

Step 5- Sit back with some iced tea because you're done.


Funny story: My sun wore these and the monster came back with green teeth!  They were grass stains!  It just added to the "look".


Nydia 8)

Tuesday, May 24, 2011

Broomstick Lace Bracelet

So, you want to make a broomstick lace bracelet.  Well I put a little tutorial here that might shed some light.  Enjoy! 


I don't really know how to crochet, but I know how to follow a tutorial.  YouTube has plenty of great broomstick lace tutorials that even the most hand-eye coordinationally (word?) challenged can follow.  This one was my tutorial of choice because her voice was very calming and mother-like. 
Broomstick lace tutorial video

Step 1- First I made a chain 15 links long.  (Please excuse me if I don't use proper terms, like I said before, I don't really know how to crochet.)  Onto that chain I single crocheted 15 times.


Step 2- Do not turn your work over!  You are basically going to take that last loop and pull it over a large knitting needle about the diameter of a broomstick or you can do like I did and just use an actual broom handle. 

Step 3- You are going to put your crochet hook through every single crochet stitch and pull up a new loop to place over the handle.  (The video is helpful here.) You will end up with 15 loops on the handle. 


Step 4- Pull these off the handle.  Careful not to unravel your last loop!   You will not turn your work over at any point.  Just grab up five loops on your crochet hook and do a single chain stitch through them.  Put your hook back through the center of your loops and single crochet 5 times in there.  Continue this process across the rest of the loops.  (The single chain stitch is only needed for the beginning of your loop series.  The rest of the loop groups after the first one just get 5 single crochets.) 

Step 5- Repeat steps 2 through 4 until you have enough material to wrap around your wrist. 


Step 6- Stitch up the two edges.  I just used a beading needle that I threaded with my crochet yarn.  I used a regular sewing stitch.  There's probably a better way to do this but I'm lazy and this worked.  So there you have it. 

Caveat- the broomstick lace is cumbersome and takes time.  I keep hearing that over time you develop a rhythm that makes it faster but I've made over a billion of these and I haven't found an easier way.  My advice: just take your time and relax.  These make great little gifts! 
Bohemian beachy cute. 

Thursday, May 12, 2011

Don't Spring Break The Pottery Barn Knockoff Mirror

This past week I was on a break from work. We had spring break! Yeah! Chest pump! Only problem is during work breaks, I get bored to DEBT! They say idle hands are the devil's tools, I say my idle hands will usually either end up around someone's neck or full of shopping bags. LOL! Sometimes I'm like a loose canon and can cause a lot of damage.

So, I decided to start a little project that I had been meaning to do.  I made this:


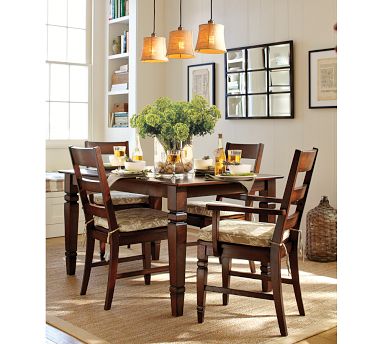
This Pottery Barn mirror had me foaming at the mouth, but at the price of $199, it was a little steep for my beer budget. (Remember folks, I'm sending a kid to college in a year!) Quite a few bloggers attempted this knockoff with great results, so I thought, "Why not? I have a brain too."


I went to the dollar store and found 12 of these little mirrors. They didn't have them in black so I had to improvise.
In my attic I had this giant piece of MDF board that these mirrors fit onto with precision. All I had to do was cut the board in half and attach it in the middle.

Getting the panels glued together was a bit of rocket surgery, but I believe my solution was a sturdy one. I basically put wood glue on both edges and stapled down the whole seam to hold it all tight. This dried for 24 hours just to be safe. After it had dried I sanded it and painted it black. I painted the mirror frames black too.


To attach the mirrors, I had to use Gorilla Glue. For a minute I thought this project would be an epic fail because if you've ever worked with Gorilla Glue, you know that it expands and creates overflow issues. This didn't happen too much so crisis averted. (use less glue if you're attempting this) All in all this project came out better than pretty good, so I'm happy! Now where should this go?
I think I'll keep her.  I'm just not sure it should go here. 
Oh, I forgot to mention, this only cost $12.00!  Score!
Nydia 8)

LinkWithin

Related Posts Plugin for WordPress, Blogger...