Do you ever find that your best ideas come to you when you can't write them down? I was driving to work the other day, when I became semi-carcoleptic, you know the feeling, you're driving and you're on auto pilot and your mind travels to dream land. During this temporary moment of escape, I got a great idea for a project. It involved glitter and that's always a great idea this time of year. It stayed on my mind all day and when I came home, I got right to work on making this.
Aren't they just darling?!
Let me fill you in on the back story first. Silhouette had a sale after Thanksgiving and I snatched up multiple downloads. I got two in particular that I loved. One was a Santa and the other a snowman. I loved them but didn't know what to use them for. That's where the car idea came in.
I wanted to make them into glittery prints! Yeah you heard right! Genius! The only snafu was I had no idea how to make a pattern large enough to cover a canvas that was 18x24. I looked all over the Silhouette blog tutorials but I couldn't find a thing. There's probably some tute out there but I have the patience of a preschooler so I improvised.
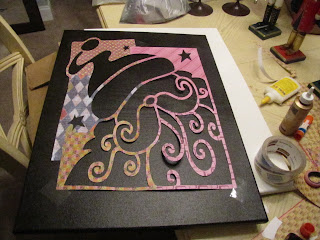
Ok so if you have the Silhouette SD you know you can't cut huge things. Here's what I did: I basically enlarged the image to the size I wanted which was 20x16 approximately. I made cut outs of each section and then pieced all the sections together. Thus, I created very large templates of my chosen pictures. I felt like the first man on the moon!
If you notice, the large stencils are actually pieced together using different scraps of paper.
Before I began the glitterfication process, I should explain that I spray painted the canvases a walnut color hence the darkness of the canvas. To said canvases, I taped the stencils and the method to my madness process began.
Basically all I did was hold down the stencil and dab glue over the open space. I was super careful not to let glue seep under the stencil. If you notice in the picture the bottom portion is complete. The hat portion is ready for the gold glitter.
Remove the stencil before everything is completely dried. As I took the stencil off I went over the edges with a Q-tip to sharpen them and remove any rogue glitter. I didn't use vinyl, which would've been easier, simply because I didn't have enough vinyl. I'm sure that if you decide to do this, vinyl would be the smart choice. However, I'm here to say it's not vital to your success.
Once they are dry you should shake off the kajillion loose glitter sparkles before they end up EVERYWHERE! And I mean EVERYWHERE, people. You don't want evidence of the twinklization process all over the place, do you?
I feel like a master of all things sparkly!
If you decide to try this, I ask that you share it with me so I can link it here for others to see.
Nydia 8)


No comments:
Post a Comment