Friday, February 18, 2011

I Ain't One To Gossip But...

Shhh... you didn't hear it from me (actually you are but I'm dramatic) but, next week I'm posting something kinda kewl!  Right now as you are reading this, I am crammed in a 15 passenger van with my parents and siblings and their kids and my kids and a butt-load of disfunctionality (word?) and tension.  I feel like I'm 13 all over again minus the zits!  We are heading over to Massachussetts for a family reunion.  Trust me I would rather get all my wisdom teeth taken out but I feel it's important to spend time with family.  (I have to say that or I'm cut off.)
Me in the middle.  I like the arms on that chair but check out the linoleum!


My giveaway is going well!  LOVE IT!  I'm seriously loving the comments and the new sites I have to visit.  You are all a creative bunch for sure!  Anyway, thanks for showing up and I pinky promise to keep posting some delightful bloggy goodness! 

Thursday, February 17, 2011

My First Giveaway!

I started this little blog as a way to document the things that inspire me and the craptastic various creative things I've made.  I didn't expect too much because I haven't been at it for long; actually I've only been at it for 2 months.  In all honesty I didn't think I would enjoy blogging as much as I do and as a matter of fact I have come to think of my followers as my best behavior friends.  (Trust me I AM CRUDE and I SWEAR LIKE A PIRATE and I'M NOT VERY SENSITIVE or so I've been told.)

So...in honor of my Evolutionites (that's you), I'm hosting a giveaway!  Yes!  Score!  I'm so excited to have found 50 other people who share my vision of CRAZY!  Trust me I had no idea you were out there.  So as a thank you, I'm giving away a $20 gift card to Joann Fabrics.  I want YOU to win this and go forth and craft something!  I'll keep the rules short and sweet.  For one entry all you have to do is be a follower and comment that you are, for a second entry all you have to do is spread the word and comment how you spread it (lol that sounded odd), for a gazillion entries all you have to do is tattoo my giveaway onto your arm (crap strike that, I'm afraid some people out there will actually do this!)   I promise this to you, if you follow, I will not make you drink the Koolaid (bad joke) and I will host another giveaway every time I reach 50 new followers. 

This giveaway will stay open until 10pm Sunday (Jersey Shore time-Partay here!).  I will announce the winner on Monday.  Good luck to all my Evolutionites and future Evolutionites!  I look forward to reading your comments, so keep them coming. 

Here's a reminder of some of the stuff seen here. 


Monday, February 14, 2011

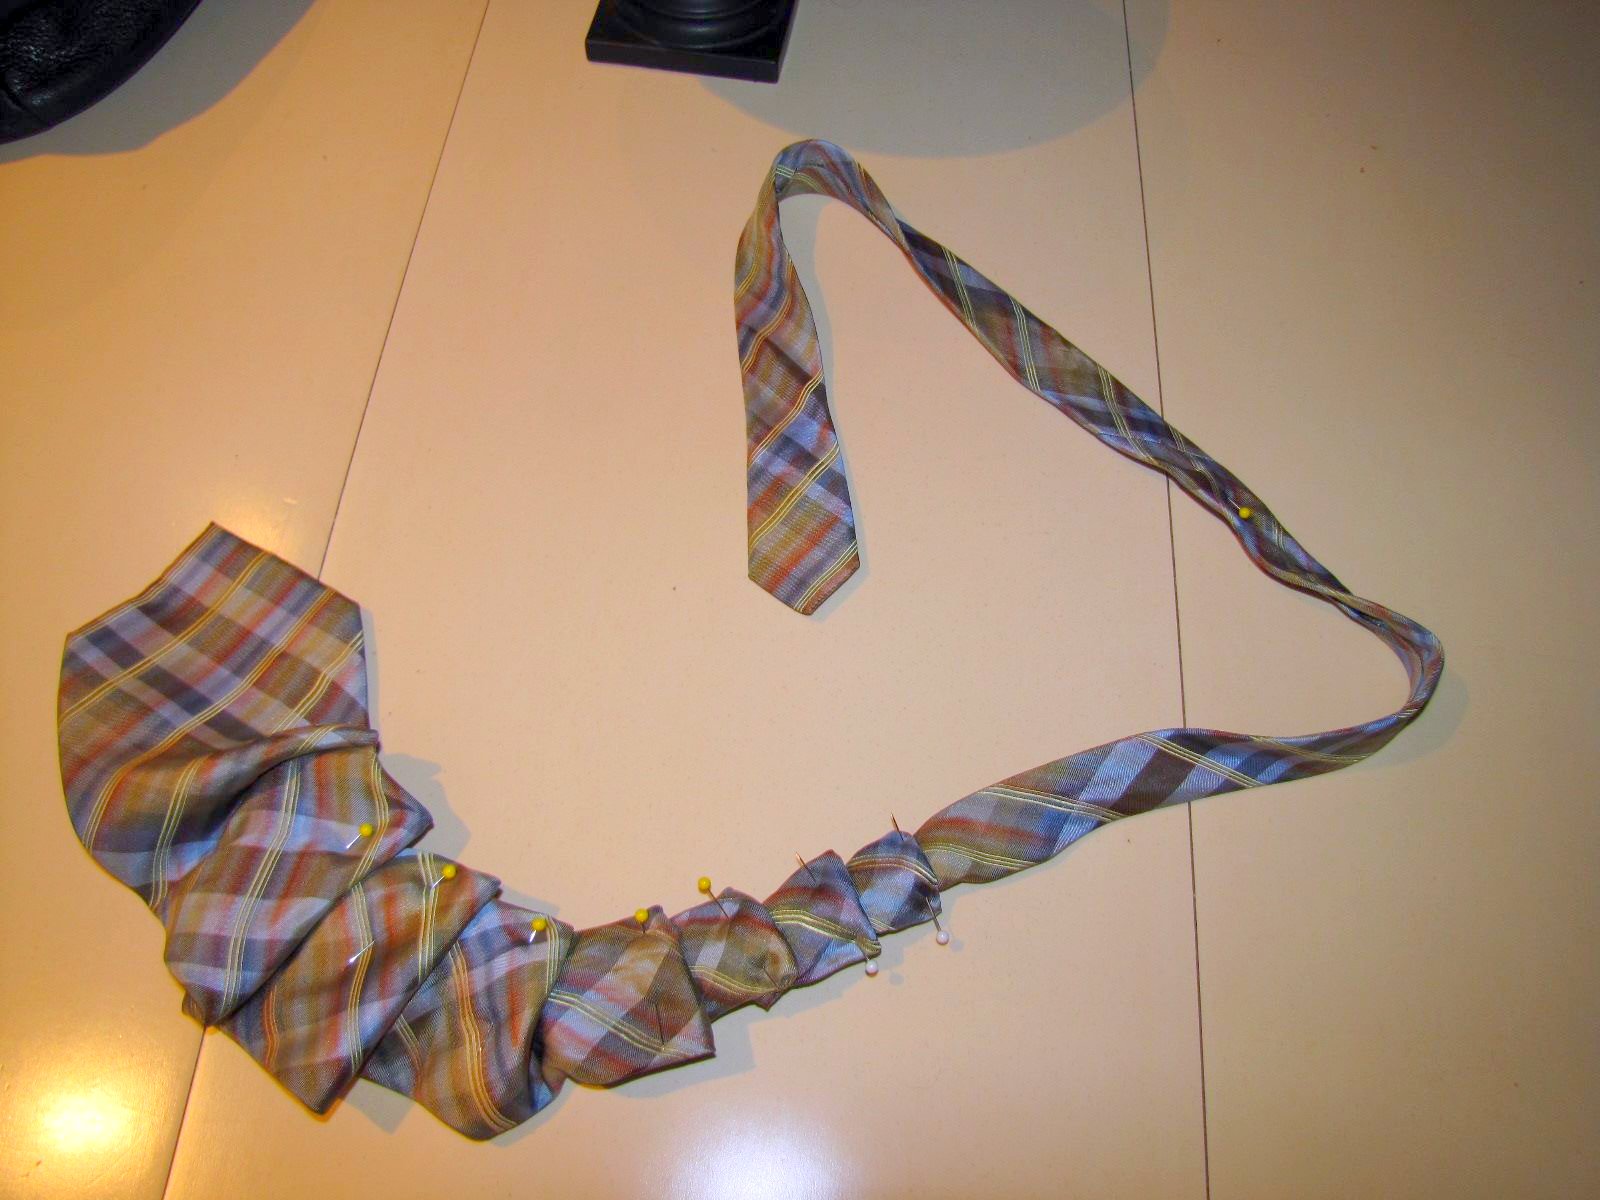
Necktie Necklace Know-How

Omg! I have found love in bloggy form over at Susanconnordesign.typepad.com! Holy macaroni! She has everything cool and chat worthy on there. Please run, don’t walk, over to her site-after mine of course! I dare you not to get inspired. I sure did. I saw this gorg tie necklace and my eyes popped out of my head! (I pushed them back in.) I said to myself, “self… this is the coolest thing I’ve seen since uh… I don’t know… EVER!” I NEEDED TO MAKE IT!- like yesterday. And that’s exactly what I did. I went ahead and made a version of it. *Note- Hey Suzy is not the actual designer of the piece. I don’t know who is, but whoever it is I want you to know that I pray at your feet because you are an artist and my imitation of your work is merely my feeble attempt at paying homage to you. Come forth genius and claim the praise that is rightfully yours. (Dramatic much?) Uh hem moving on now; here’s how I made my version.

Step 1: Stole tie from unknowing husband. (Poor thing doesn’t know what the heck is in his closet. He’s fashion blind.)

Step 2: Snatched a handful of pins. You should be careful not to get poked- I’m just saying. These pins will be used to hold together the temporary folds.

Step 3: Placed the tie around my neck and began folding and pinning. Do this until you have a necklace size that suits you. If you are like me, at this point you will have: 1. Cursed about $1000 into your curse jar and 2. Have enough pin holes around your neck to require a transfusion.


Step 4: Sewed the folds in place from the underside of the tie. I did this because I didn’t think to glue it until now. Darn it! I swear sometimes my brain is like a solid brick of lard!

Step 5: Cut away the excess and sewed a matchy button onto the front of the tie. Under this button be sure to sew a snap closure that will attach the two pieces around your neck.

Side notes- I could’ve made a button hole and all that fancy stuff but making button holes has proven to be my new Dante’s hell!

This is my "cool" face.  I should have slathered on some lipstick!


K-bye now, I have to go find an outfit to wear this with.


Nydia 8)

Monday, February 7, 2011

A Horse Is Of Course A Piece Of Art

 Remember when I said I was into rustic?  (I said it here.)  Well I’ll say it again; I’m really into rustic!  Another thing I do is hang on to Pottery Barn Catalogs forever!  This planked pony art piece was in one such catalog that I’ve been hanging onto since God knows when.  I looked for something similar everywhere because God also knows I’m not paying crazy money for anything.  Since I didn’t find a suitable replica, I decided to go ahead and try to make it.   What did I have to lose?   I already had everything I needed on hand.  Since I didn’t have three separate boards like the original seems to  be constructed of, I decided to use a similar sized piece of wood that was originally the door to my crawl space.  Sorry hon!  When my husband saw I had taken it, he said we’d have one cool door for our crawl space.  As if!  I get the feeling he doesn’t much care for my brand of crazy creativity. 
Here’s how this copy cat art went down.  I had the piece of pine (or some other wood type) board.  I took three screws and a nail out of it and filled the holes with wood filler.  Then I sanded it with my ever so cute orbital sander that my hubby *swoon* bought me.  I wiped it down and took a break to clean my house.  It was starting to look like the show “Hoarders”. 

I came back later to it for staining.  I had a walnut stain left over from another project and I just used that.  Hindsight, the original piece has a more reddish tone, I probably should have used the mahogany stain I had.  Anywho, I let that dry overnight, then proceeded to clean my house some more and even visit the in-laws. 


While the stain dried, I went ahead and got a silhouette of a horse enlarged at my local Staples for $1.99.  I took this enlarged copy and glued it onto the reverse side of some contact paper.  *Remember to reverse your image.  I cut the outline of the horse from leftover contact paper; it’s cheaper than using my Silhouette vinyl. 


I stuck this vinyl cut-out onto the stained board.  *Make sure the edges are well adhered to the board otherwise your paint might seep under the edges. 

My next step was to paint sloppily over-wait that’s just me, over the silhouette with a brush.  The more visible your brush strokes are, the better!  I used leftover trim paint because it was FREE! 

Peel off the contact paper and you should have something like this. (God willing!)

This didn’t take that long to dry; only about three hours.  (I cleaned my house.)  My last step was distressing it.  I did this by calling it names such as buffoon and ninny.  (I kid!)  I just took some sandpaper; 80 grit to be precise.  I used 80 grit only because it was handy, but I recommend a finer grit. 

I had to sand straight edges across my piece to give the appearance of separate boards.  Then I sanded the edges and some choice spots here and there.  Finally, I gave it a light onceover for an overall aged look.  (I think someone’s been doing that to my face while I sleep.) 

Ah-hem, moving on, here’s my final product.  I’m as happy as a pig in poop!  Lately, I’m REALLY appreciating the crap out of Pottery Barn and their creative genius!  Oh and by the way my cost was $1.99 not $199!  How fab is that?! 

Here's the Pottery Barn version.  Isn't it gorg!!!!


The photo looks darker than it actually is.  I love you I really do-ooh!


Nydia 8)

This post is linked up here:

http://www.thegypsyscorner.com/2011/02/115th-three-or-more-tuesday-simple.html


 http://linda-coastalcharm.blogspot.com/
Photobucket

Thursday, February 3, 2011

Valentine Peace Offering Gift Box

Because it is February and I am busy as a bee, I decided that I would post a quickie Valentine craft.  This one is a gift box that I covered in decorative paper and decopaged with a picture and foam hearts.  Easy as canned meat for dinner!


I started out with this box.  My evil kids poked holes in it. 


 I covered the box with some decorative stripey scrapbooking paper.  While that dried, I took a marker and drew a couple of cracking up faces on my fingers.   I then took a picture of my hand making a peace sign.  I uploaded the image and added text and a frame using Picnik photo editing.  I printed the picture and decopaged that onto the box.  Last but not least, I glued on some foam hearts and voila; finished; makes a great little gift box!

It says, "You and me are two peace in a pod!"


Nydia 8)

Wednesday, February 2, 2011

A Corded Pillow According To Me

It’s no secret around these parts that I can’t sew.  Does that stop me?  Heck no!  I press on-no pun intended.  Since straight lines are possible even for the most sewing challenged individuals, that’s what I do.  I sew straight lines that eventually become pillows. 
After making about one thousand pillows, I felt like I needed a challenge.  I was now ready for –gasp-cording!
Cording is one of those things that makes a sewing novice look like a darn (there I go again with the puns) pro.  The secret is, it’s kind of easy.  Ok maybe not ABC/123 easy, but certainly doable if you have opposable thumbs. 
The actual making of the cording involves a special tool: you need a zipper attachment.  Mine cost about $3.50.  Not a bad price to pay for a tool that makes you look like a couture seamstress. (Slight exaggeration maybe.)  I plan on using this puppy for years of sewing pleasure and goodness.  Oh did I mention it sews zippers? 
Yeah so like I was saying, I wanted to add some pizazz to my pillows by adding cording and decided to give it a shot.  I had some rope lying around the house, probably left over from something my husband had tied up.  (lol sounds incriminating) I used this rope and wrapped it in some white denim type fabric; then sewed along the edge to make cording.  That’s it; done; easy.  Oh by the way, I cut the fabric strip to be about 3 inches wide.  This provided me with more than enough fabric to wrap around the rope and leave me a seam allowance. 
Exhibit A

I had measured the perimeter of the pillow I was going to prettify and I sewed a long strip of cording accordingly. (Did you catch the play on words there?  I crack myself up!)

After the cording was sewn, I sandwiched that between the two pieces of fabric that were about to become my fancy new pillow.  I pinned all this material together and sewed it up to an inch before reaching the corners. 

Ah the corners, the tricky wrench messing up the works.  Those corners were devilish- I had another choice word but some of you might have fainted. The corners needed to be rounded slightly without causing the needle to slip or the fabric to bunch.  I seriously had to pray about it.  I suggest you play with it a little as you maneuver the cording around corners.  (Either that or have a tall glass of wine next to you to ease your nerves.)  Once you’ve sewn almost all the way around the pillow-remember you’ll need to leave yourself some space to stuff a pillow form into it- you’ll turn the whole thing inside out. 


At that point you can stuff your pillow and begin the process of wishing you were never born closing up the gap and connecting the two pieces of cording.  First things first, you need to expose some of that rope and cut it so you have a little fabric left to wrap over the other end of the cord.  This will make it look finished.  To close the hole you could glue the seams together with fabric glue or you can hand stitch it.  I went with hand stitching because I’m an expert on padded cells I forgot I had fabric glue. 
Let me just warn that the addition of cording might elicit some responses you weren’t expecting such as a compliment, from a husband and or teen, on your sewing skills or the sudden misconception that you now have the sewing ability to make slip covers and crap like that for people.  Tread lightly on this one my friends. 


Nydia 8)


Tuesday, February 1, 2011

These Valentine’s Day Crayons Will Melt Your Heart

Ah Valentine’s Day, a day of love; a day to show your appreciation of others; a day for kids to engorge on candy. It’s always a plus to get free candy but there are a ton of food allergies in my sun’s (spelled like that on purpose) second grade classroom! There are peanut allergies; gluten allergies; and some other random allergies I’m sure. I don’t want to be blamed for poisoning an entire class, so chocolates are out of the question. So, I decided to go with non-candy Valentines this year.

Sure, I could’ve gone out and bought some Valentine’s Day cards (hubby was really leaning towards this option), but we all know those usually end up in the trash. I saw some really cute ideas online and decided to reduce, reuse, and recycle some things I had on hand. For some reason, I have amassed a crazy huge collection of old crayons and boy was I glad to put them to use! I used three crayons per heart and three hearts per package. There are 22 kids in the class. This project used up a lot of old crayons! Yay me! My carbon footprint is getting smaller. (Remember my 101 in 1001?)

This project was not exactly barebones cheap but I figure I can reuse the materials I purchased on other things later on. Let’s call it an investment, shall we? I bought a heart shaped silicon baking pan that cost $7.50 and some sandwich bags for $2.50. I can reuse the pan and I had a zillion bags left over. I also printed labels to staple to the tops. Cute packaging really makes a difference; just look at all the Hello Kitty crap out there.

The hardest part of this project was getting the wrappers off the crayons- talk about tedious! At first I tried peeling them off but after a million crayons, I got tired. So, I smartened up and got myself a razor blade. This made quick work of those nasty labels, but sliced my pinky to shreds. *cry* My son, however, had a blast breaking all his crayons. Kids love all things destruction related.


I tried to make them camouflaged because my son is really into army things and so is every other boy in his class – uggh, I can’t wait for this phase to end! We arranged the crayon pieces to make a camouflaged pattern we’d like; darker colors for the boys, lighter colors for the girls. I put these in the oven at 170 degrees for like 10 minutes. When they were melted down, I just took the whole cookie sheet and silicon pan outside (because it’s freezing out) and let them cool down. Some of the online instructions called for putting the melted hearts into the freezer to harden. I don’t know about you but I don’t feel comfortable about taking something right from the oven and putting it into my freezer.

After the little hearts had cooled and solidified, I bagged them up and stapled the labels to the tops. The labels were created using my Silhouette machine- I use this thing A LOT! For the boys I used primary colors and “boyish” shapes. For the girls, I used pastel colors and “girlish” shapes. As you can see, I changed up the colors a little with the girly Valentine’s. I hope the boys don’t notice-who am I kidding they’re boys.
I love how these came out! Not as cute as some of the other ones like these, these, or these, but my laziness ability levels were just not up to par.


So Cauute!


Nydia 8)

LinkWithin

Related Posts Plugin for WordPress, Blogger...