Thursday, March 31, 2011

This Girl's Got Big Decorative Balls

Ever since I started wrapping (see here and here), I've wanted to make my own decorative balls.  While these are not usually very pricey, I knew that I could make them for free. 

I thought I was being so creative, then I saw about a kagillion tutorials on how to make these, all over the interwebs!  At that point I felt like I was jumping the shark a bit.  Who cares though, right?  What's another set of balls among blogs? 

Mine are made from kitchen string and some styrofoam balls I bought back when I had money to waste.  Here's my tute:

Step 1- Gather up these materials: some styrofoam balls (size is up to you), a glue gun, some type of string/twine/cording/etc., and some tacky glue or plain old white glue such as Elmer's.


My son was my photographer.

Step 2- Braid some long sections of string and glue the ends to keep them from unraveling and to retain the end's braid shape- this will help create fading seams.


I allow him to be part of the creative process because I don't like my crafting to take away from my kids.

Step 3- Glue one end of the braid to the top of the ball using your glue gun.  Spiral it a little for some extra hold.  This also helps you get started. 


I think he's pretty good for a 7 year old.  I mean come on he captured my process perfectly.  I'm biased.

Step 4- Slather small sections of the ball with your tacky glue.  Continue to wrap the braid over this glue.  Be sure to keep adding glue as you wrap.  Continue this process half down the ball.

Step 5- Turn your ball over and repeat steps 3 and 4 making sure to match up seams. 

Step 6- Allow to dry.  Call people over to admire your handy work.  Search the house for more string.  Skip sleeping at night because you develop a brain erection that can only be relieved by making more stuff. 
Oh wow!  Too much information.  That other stuff just happens to me.  Sorry. 

Not too bad.  Free works for me.

Nydia 8)
Tuesday, March 29, 2011

It's A Wrap, Wrap Bracelet

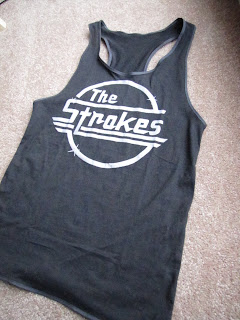
Remember when I told you guys that I made some things successfully for my daughter?  Things such as this.  Well, she's at it again!  Apparently, the Strokes tank top was part of a "look" she was going for.  You see she had this vision all played out in her head.  I won't go into all the details but a bracelet, in her mind, completed the ensemble.  Not just any bracelet though, hers had to be a Chan Luu, which costs about a million dollars!  I kid.  They're actually about $180-$240 which around these parts might as well be a million because they're still just as unaffordable.  MAJOR WALLET THREAT because they are FABULOUS!  What to do?  What to do?  Well, I'll tell you what I did. I searched out a wrap bracelet tutorial and got to WORK!  That's what I did. 

Now... providing you with a tutorial on this site would've been nice of me, but I never claimed to be nice and frankly giving an entire tutorial on how to make this bracelet sounds about as exciting to me as unflavored jello for dessert.  Besides this video tutorial is SOOOO MUCH BETTER than anything I could ever explain. 

I had these supplies on hand already.  I just bought beads. 

This project was so easy and cheap that I ended up making two!  Here's the one I made for my kiddo.  So Hawt!!!  It's very beachy, bohemian! 


Isn't she precious?!

Check out the video tutorial.  It's super easy to follow! 


Nydia 8)

Monday, March 28, 2011

My Heart Dances With This Ballerina Painting

I know it's been a while since I posted anything.  You see after going away last weekend and working all week, I had to spend this weekend literally mowing the laundry.  I did work on a couple of things this week but I thought to break my Mondaze by posting this lovely picture my little girl (ok not so little) painted. 


Isn't she lovely?!!!

Around these parts this was kind of a big deal.  Rather, a VERY BIG DEAL! She actually had this one and a few other pieces on display at our local museum.  I was prouder than a peacock!  A few people even wanted to purchase it!  Gasp!  She couldn't believe it.  You see, my daughter is a self proclaimed nerd-person but she has an artistic side. 

When we finally got it back from the museum, I obviously wanted to put it up on my wall.  This was super quick and simple.  I had a picture frame with a broken glass in it.  So I painted it black and popped the ballerina in it.  That's it!  It cost me nothing and it's quite likely the most valuable thing in my home right now. 

Seriously, everytime I look at it, it makes me smile.  Thanks Muffin Top!


LOVE IT!


Nydia 8)

Friday, March 25, 2011

Where In The World Is The Evolution Of Home Girl

Well folks... I've been away for a few days.  First, my brother-in-law finally decided to get hitched to a great girl.  This all occured on the island of Ocracoke off the Hatteras Coast of North Carolina.  If you've never been there, I must say it was a great experience!  It was a beautiful place with a small (I'm talking small as in water on all sides you look, small.) town feel.  During the summer it's a super happening place.  I also can't say enough about the pristine beaches.  Anywhoo, we had a great time with family and friends.  I LOVE NORTH CAROLINA!!!!!  (LoL I even came back with a crazy southern accent!) 

Second, it was my birthday on the 24th and I do birthweeks around here.  So... I decided to take the load off and just enjoy my time.  (mainly watch tv)  Plus I'm sooo hopelessly addicted to Angry Birds.  Seriously people it's like crack!!! 

I have a quite ambitious project coming up.  It has to do with a birthday present I had my husband pull out of the trash.  LOL I'm simple like that.  Seriously though, I'm SCURRED!!!! I don't know if I can't take on this project and my husband says and I quote, "if I dragged this darn thing out of the trash to put it in our trash, I'm never going to road kill rescue for you again!"  Yes.  I know.  I must finish this project!  Plus, I feel bad because he got his suit all dirty.  I don't want him to have another MANTRUM so I'm stuck. 

Wish me luck.  I really need it!!!!


Nydia 8/

Monday, March 21, 2011

Stroke Of Genius Strokes Tank Top

My daughter is the apple of my eye.  She is truly the BEST!  This is why when she comes to me with a request I usually oblige.  This time the request was for a Strokes band T-shirt.  I promptly purchased the T-shirt for her, but this wasn't the end of her request.  Oh heck no!  She wanted a razor back tank top.  I CAN'T SEW! What the heck, she might as well had asked for a wedding dress!  Now because I adore her and she's a good girl who behaves and gets good grades, I decided to attempt this razor back contraption she wanted.  Oh Lord, I was about as nervous as a long tailed dog in a room full of rocking chairs! 

Here's how I survived and came out looking like a superstar!


Step 1: I cut the sleeves, neckline, and hem off.


Step 2: I cut the neckline down to an acceptable length in the front and opened up the back to a razor back style.  (I used a similar shirt and chalk to draw my cutting lines.)


Step 3: I sewed up the sides to make it more snug and trimmed the bottom to make it shorter. 


Step 4: I added bias tape trim to all the raw edges to keep them from unraveling.  (I even did this on the inside seams.)


Step 5: She wore it and loved it.  I gloated and gleamed at my sewing powers.  (Seriously, considering my sewing disabilities, this project made me feel like I had just landed it in the Hudson!)  I AM MOMMY HEAR ME ROAR!  Now I'm a hero to her.  (Until she makes another request.)  Oh the pressure! 

Nydia 8)

Wednesday, March 16, 2011

My Naughty Boy Discipline System

Ok get your mind out of the gutter.  This is a family blog.  I thought I would share with you how I discipline my SUN when he misbehaves, without having to resort to losing my mind.  It's a really simple system that if used early enough can become SUPER effective.  You see, small children want to please their caregivers but often forget rules and such.  They tend to be visual learners.  I'm a teacher and I can tell you this WORKS! 

I use Naughty Boys as a way to keep track of my son's behavior.  These were originally clothes pins.  I basically made angry little boy faces with crossed arms and magnetized the back of them.  When my little one is not being a good boy, I warn him about receiving a Naughty Boy Stick.  He straightens right up.  It's wild how well this works.  You see the last thing he wants to see is a row of angry faces stuck on the fridge to remind him of what he is about to lose.  You can customize the punishment.  Say for every naughty boy stick 15 minutes of timeout and at 3 naughty boys loss of a toy, etc. 

These little guys are so cute, I almost want him to get in trouble.  LOL!  I think my daughter feels the same way because she keeps trying to set him up! 

Regular Clothes Pins

Sketched in pencil

I used paint pens to make these SO STINKIN CUTE!  There are magnets attached to the backs. 


Nydia 8)

Tuesday, March 15, 2011

We Have Come To A Forsythia Floral Arrangement

Well hello again my fellow dot-comrades.  Thanks for checking in on my little blog.  I have for you today a quick little project I worked on for spring.  I revamped a pitcher vase that I had sitting around in my basement.  *Side note:  I say this a lot! 

People, I must be honest with you, I have a ton of crap in my basement!  My one goal in life is to decrappify it!  Someday this could be achieved, if only I would stop refilling it with more crap.  Don’t get me wrong, it’s organized in there but there are just too many things down there.  This particular pitcher vase had been a part of a previous project shown here. 
I didn’t think the look of the before was completely gross.  After all, my favorite colors are beige, cream, and light tan.  However, I knew I wanted forsythia blooms in it, so I decided to go with oil rubbed bronze instead.
Pop some forsythia blooms in it and we are ready to rock out spring.  That’s it my people.  Does it get easier than that?  Reuse, reduce, and recycle.  I need to work on the reduce part because I keep buying things, but that's another story.


Nydia 8)

Friday, March 11, 2011

Look Ma No Metal Toilet Paper Wall Art

We all remember the masterpiece Suzy of Suzy’s Artsy Craftsy sitcom created.  How could we forget?  What she created out of toilet paper and paper towel rolls was nothing short of genius.  I think it’s no exaggeration to say that this single project changed my whole outlook on life.  (oh brother) I like genius.  I like to imitate it whenever possible.  Here I present to you my second grader version of her project. 

First, I needed to collect toilet paper and paper towel rolls.  I didn’t think this would be hard considering we are a family of four used to eating plenty of fiber.  Go figure.  I’m always complaining that I’m the only one who ever replaces the paper when it runs out and the one time I’m actually excited for it to run out, it doesn’t. 

Once I had all the rolls collected, I cut them up into ¼ inch strips.  The paper towel rolls were cut lengthwise and the toilet paper rolls were cut widthwise.  I used the paper towel tubes to make the framing, one big square with a four way division.  This left me with four little boxes to put scrolls into.  I attached everything with Elmer’s glue and then applied a thin layer of Modge Podge to make it sturdy.  That completes the framing. 

For the scrolls inside the frames.  I cut (7) 2 and a half inch strips.  One, I used as a center piece onto which I glued all the curly q's.  The top two curly Qs were made by wrapping the pieces around a meat thermometer.  (It was the only thing I had on hand.)  I glued those onto the center stem then glued another two under those.  The little hearts at the bottom were made by folding the piece in half and then curling the ends. 


Once all my scrolly piece were complete I glued them inside the frame, spread a thin layer of Modge Podge and allowed it all to dry.  After it was all dried and felt pretty solid, I used hammered metal paint.  This is the name of the paint.  It's intended to create a look of weathered metal or something.  What do I know?  I'm no blacksmith. 

When it's all said and done you will have something that looks like metal iron work.  Suzy's are perfection because she is 1.) obviously talented  2.) took her time and 3.) measured, cut and glued carefully.  I'm a moron and did none of the above so mine look like sh crap.  It's my house though, so I'm hanging them.  LOL


 Nydia 8)

Thursday, March 10, 2011

I’m A Monogrammed Bathroom Basket Case

The hand towels in my powder room were out of control.  They were all over the place.  I don’t have a little towel hanger for them since we demolished the entire bathroom changed things around in there.  Actually, the powder room is in the process of being remodeled.  This has taken an EXTREMELY long time because I haven’t decided what to do with the counter top in there.  I’m seeing all kinds of options but I’m really feeling some teak wood tops I’ve seen lately. 

Anyway, I got off topic, the room looks nothing short of jacked up!  The hand towels were just the one thing that put me over the edge.  No way, it wasn’t the fact that I have unsanded dry wall patches.  Or the fact that the faucet is a tarnished brassy color or the fact that the lighting looks like it was pulled out of the Titanic or the fact that the formica counter peeled off and now I have a spongy counter top. I’m not bitter though. (eye twitch)

I’ve got plans, they’re just taking a little longer than I had anticipated.  I decided to be a little proactive though and at least organize those darn hand towels. So here it is. 

·       I took a sturdy little box that was in my basement since Nam. 
·       I covered that bad boy up with $2.00 worth of burlap fabric.  (I used Elmer’s glue.)
·       I cut the corners to make sharp neat edges and I even covered the bottom and insides like a good little crafter. 
·       I made the monogram using a stencil and a paint pen. 
 
Plain sturdy box.

Burlap scrap.


Don't forget to cover the inside.

I love the way this came out.  These are so easy to make.  I think I’ll make more! 

Wednesday, March 9, 2011

Would You Ever Wood Bowl Made Over

I love the wood bowls displayed throughout the Pottery Barn catalogs.  I guess they were originally used for dough or something.  I think they’re the bee’s knees.  They make me feel like I live on a farm or something.  If you ever met me you would know that this is a ridiculous notion since I’m the farthest thing from country you could imagine.  Either way though, I LOVE (screamed at the top of my lungs) wood bowls right now! 
While perusing the thrift stores, I’ve been lucky enough to find a few of them and for the most part they’ve been cheap as nails.  Seriously, the most expensive one I’ve found was maybe $3.00 and these retail for $40 and that’s Target prices. 
The one I’m featuring here was $3.00 at Goodwill.  This one had some type of peacock thing painted inside it.  It was not only ugly, but gross too.  This big boy was guilty of ugly in the first degree! It needed TLC before getting onto to my table. 

See what I mean? Sorry about the Iphone picture.

I took the ugly off by stripping the “paint job” with furniture stripper.  After the paint was gone, I sanded it.  This process took a long time because the darn thing had so many layers of shiny polyurethane! 
Once all the gibberish in paint form was removed, I really began to appreciate the rustic look of it.  It took a little bit of elbow grease but all in all I can’t complain because I didn’t have to pay over $40 for a look that I’ll probably be over with in a few months. 

For $3 bucks I am totally happy with myself. 


Nydia 8)

Tuesday, March 8, 2011

Nothing Rough About A Ruffle Necklace

I recently became inspired after seeing a few ruffled necklaces on the blog-o-sphere and decided to try making my own out of scrap I already had.  There's nothing quite like turning garbage into usable things that gives me such satisfaction.  You know keeping things out of landfills is just so sexy to me. 

Here's how this cute necklace came together:

First, the materials you will need: a needle nose plier, a chain, a clasp, and a piece of scrap fabric. 
The fabric is a piece cut out of my husband's old slacks. 


All I did was fold the fabric over the chain and stitch along the edge while ruffling the fabric.  That is all folks.  Oh, I also added buttons for a decorative touch. 

I wanted to show you how it looks on.  These are my Pilates clothes, I won't be wearing it like this.  I was thinking of wearing it with a structured snug fitting dress since the necklace has a men's wear feel to it, we'll see. 


Nydia 8)

Thursday, March 3, 2011

Dog Food Container Courtesy of Ballard Designs

Ballard Designs strikes again.  They’ve gone ahead and come out with another catalog full of great things to either buy or imitate.  I have no money, so I imitate.  It stinks to be poor.  Pooh!

My husband has a dog.  The relationship between the dog and I is, at best, considered complicated.  We live to dislike each other, yet we look out for each other.  It’s a little weird.  She protects me and I feed and shelter her in return. 

Because of this mutual dislike, I don’t think to prettify any of her things, however, in the Ballard catalog there were these cute dog food containers that were just simply adorable!  I liked these so much that I decided to put our differences aside and make it for her. 

Remember these cans from here, well that’s what I decided to use.  They were just the right shape and all I had to use was spray paint.  No brainer, right?  Duh!  I shot the can with some white primer first to cover up the lettering and then I hit it with Rustoleum’s heirloom white spray paint. 


Since the lid on the original Ballard dog food container was black, I decided to make mine black too.  I just hit it with ruddy brown primer and then with Rustoleum’s satin black paint. 
The lettering on the can was done on my Silhouette machine using text that resembled the original. 

I think it came out so CUTE!  Now my baby daddy’s dawg has a great place to keep her nom noms.  Oh and the cost of this was…you guessed it FREE!  Here is the Ballard Designs original.  Here is mine:


All is well in the evolution of home bubble. 

Nydia 8)

Tuesday, March 1, 2011

Extreme Makeover Cabinet Edition

I have a hard time turning away used furniture.  If someone asks me, “hey do you want such and such”, I say sure without hesitation.  I don’t know why I do this and frankly it’s not like I have the room for it.  However, I take the free item and either use it, modify it, give it to someone who can use it, or donate it. 

My wonderful mother in-law is famous for offering me things.  GAH!  I just love her!  Seriously guys she’s awesome.  She is an extremely generous person and I’m lucky to have her.  In-laws are the side dishes of marriage.  I ordered a beef cake husband and he came with a side order of mother in-law.  She’s like a great side of steak fries that come with your burger.  Awesome! 

Enough about that though, there is a point in all this.  About a year ago, she gave me a curio cabinet that she no longer had the room for.  (I’m sure the actual story was she no longer liked it.)  She offered it to me and I snatched it up like a squirrel and a nut.  Trust me I didn’t know why I wanted the cabinet because it didn’t go with any of my stuff.  It was a dated brown oak-ish color and that is my least favorite oak-ish color.  IT NEEDED TO BE CHANGED!  I’m using my caps lock voice here people.  
I set out to change it and believe it or not this project began in the early fall when it was still rather warm out.  I dragged it out all this time because it was so DARN HEAVY and because the weather got icky.  So in the garage this thing sat primed and ready to go, until this past weekend. 

Initially when I primed this piece I used white primer because I was going to paint it white, but then I had an idea.  Poof if occurred to me that a white cabinet wouldn’t go with a thing I own, so black was the only option from then on. 


Here you can see the original "brown" and my attempt at white.

I primed the whole thing with a ruddy brown primer just because that’s what I had on hand, then over that went the satin black spray paint that I also had on hand.  I knew I wanted to display some of my white serving dishes in it so I painted the handles white to add contrast. 


Here the final result.  I love it!

Now I have a cabinet that was free and that I love and that serves a purpose and that looks chic and that’s why my mother in-law is all that and a bag of chips!


Nydia 8)


Linking up to:
http://todayscreativeblog.net 

LinkWithin

Related Posts Plugin for WordPress, Blogger...