Pages

Thursday, August 16, 2012

Foodsaver Personal Pan Pizzas

I'm not being paid to say this but one of the best appliances I've ever purchased has to be my Foodsaver!  If you're not familiar with what this puppy does, let me fill you in.  It's a machine that sucks the air out of bags and vacuum seals them.  So basically, you put your food in these special storage bags and the Foodsaver sucks the air out and vacuum seals your meal and then you freeze it or refrigerate it for however long it takes a hungry family member to discover it.  The beauty is that food last a LONG time when it's sealed this way.  Oh and no freezer burn.  Oh and you can microwave it in the bag.  Oh and the food tastes just as fresh as when you put it in.  Oh and I've saved tons of cash by storing leftovers and not having to buy takeout.  Oh and I don't have to throw out food because it's spoiled. Oh and the bags are washable and reusable.  I'll stop now to show you what I made recently.

Here's mine.  It's a little used to say the least.  


I made personal pan pizzas yall!  You heard me!  I made all different kinds too.  I like certain toppings on my pizzas that my kids want no part of.  I made the dough from scratch so no nasty preservatives. The dough recipe can be found on any site with basic food recipes but most of the recipes for pizza dough call for two cups of flour which equals 4 personal pan pizzas when you divide the dough into quarters.

One quarter of the dough in a ball shape on a flour dusted surface.  

Pound the dough flat.

Roll it out with a rolling pin.  

Make a lip by pinching the edges. 

Add your toppings and place the pizza on some freezer paper in a baking pan.  I stacked my pizzas on top of each other and froze them for about 4 hours.  This made it easier to vacuum seal because the air suction would not suck the sauce off and it was better to manage hard dough.  

I folded over the wax paper and slid the pizzas into the Foodsaver bags and sealed. Now when I'm feeling lazy about cooking all I have to do is pop one of these babies in the oven and I look like a superstar.  

Nydia 8)


Saturday, August 11, 2012

I Made a Dress Out Of a Man's Shirt


There's a group of crafty individuals out there that are using old thrift store clothes and turning them into useful, cute clothes.  I wanted in, but I can't sew.  That is until now.  All summer long I've been learning how to sew; on my own with no teacher.  There are a lot of tutorials on the internet for this.  Obviously I'm still a beginner, so I've had a major learning curve to overcome.  Here's a couple of the dresses I've made so far.


This dress intrigued me with its pattern.  No they are not strawberries.  The pattern of the fabric just put me in a good mood.  This was a very large dress and I am a very small person, so I had plenty of fabric to use.  Oh and it cost only $2.50!


This is the dress I ended up making.  I used a pattern from Patterns.com.  This pattern was only 99 cents to download but it was written in Russian!  Did I mention that learning curve?  I had no instructions to work with but I stuck with it.  I'm a trooper I tell ya.  


I'm pretty happy with the results.  Not too shabby for an absolute beginner.  

How about this little gem here ladies and gentlemen?


This next dress started out as a man's shirt from The Gap.  I liked the light green pattern and the material was cotton.  You can't go wrong with cotton when making a summer dress.  This shirt cost a whole $2.50.  

This is the final summer dress I came up with.  I kept the button details and the shirt tails.  By the way, I used a free online Burda pattern.  Check out Burdastyle.com.  They have tons of free downloadable patterns for all levels of sewing competence.  

I love the back of this little dress!  Seriously check out Burda Style.  They have really up to date fashion patterns.  

I also made this skirt out of a HUGE one I found at Goodwill.  Cute no?  The skirt was FUGLY!  Sorry I forgot to take a before pic.  Basically I took the original skirt apart and added a contrasting band from a pair of slacks my husband thought he threw out.  Honest I'm not a hoarder.  


My mother asked me why I wanted to sew when store bought clothes are so cheap.  I told her the satisfaction of "I made this" can't be bought.  Am I right?  


Nydia 8)

Friday, August 10, 2012

Re Size Earrings That Are Way Too Big

The other night I went out to dinner with my husband and I got all gussied up.  You can relate; right?  Well, normally my hubs is all like, "Wow!  You look tasty.", or some other classy man statement.  However, the other night, he went all, "Holy cow!  Those earrings are BIG!", and he didn't mean this in a good way.  Don't get me wrong, I couldn't really care less about my husband's opinions on fashion but this somehow got me to thinking that maybe at my age, thirty something- cough, I might be getting too old for the whole wagon wheel sized earring fad.  The problem was I really liked those earrings.  What to do?  What to do?  I know!  Re size them!  And that's precisely what I did.  Check this out.


This earring was almost as big as my hand.  


First I had to unhook the loopy things from the earring hanger thingy.  Sorry, I'm not more technical with terms folks but I'm not a jewelry designer by any stretch of the imagination.  


I found something with the desired circumference I was looking for.  I bent the earrings around this bottle of glue to re size them.  

This is the new size I was left with.  I think it's a much better fit for the size of my head.  Don't you think? 

I cut the loopy things off.  

See the loopy end there all dismembered.  I used a wire cutter for the job.


I was left with a smaller more acceptable sized earring.  Oh and you can't mistake the cuteness.  


Nydia 8)

Friday, July 27, 2012

An Earth Friendly Pool House

I've been missing in action and to tell you the truth, the reason has been I just didn't feel like writing.  So what have I been doing lately?  I've been actively supporting my son's baseball team.  I've been having fun with my crazy book club peeps.  I've been teaching myself how to sew.  I've been making more projects, memories, wine, etc.  Here's the latest on the home front, a solar pool house.  I love this thing!  It gives us shelter from the sun, much needed entertaining space, storage, and best of all, it powers my entire house!  Isn't that just peachy?!

My husband is in the solar business and much like the dentist with the bad teeth, the mechanic with the broken down car, and the smoking nurse, we were living without solar panels!  Gasp!   My hubs wanted this situation taken care of but we didn't have enough roof space on our humble abode.  As he patiently explained, our electrical needs far surpassed our panel capacity, so our only option was a ground mount solar display.  CAN YOU SAY UGLY?!!!!  I was like HECK NO!!! Not in my backyard.  Needless to say this put a delay in our green goals.  So, I forgot all about it and I thought he did too... until I came home one lovely day in early May to this.


Can you imagine my carnal anger pleasant surprise?  I yelled  called for my husband demanding  asking what this pleasant surprise would some day look like.  He had drawn out plans and everything.  What a GREAT surprise!  (Eye twitching)  I just about cried because my husband is not the type to complete a house project in a timely fashion.  


The structure was taller than my actual house.  Can I just tell you, I can't keep track of how many neighbors came by asking what in the heck my husband was building.  Seriously, it looked like a hotel was being built behind my house.  Some of them shook their heads in concern and others turned their heads slightly as if they felt sorry for me.    

 This stage was not a happy time for me.  I kept thinking it would never be finished by summer and even if it was, it would look awful!
At this point it was starting to come together and some of the height had been taken down.  I actually started to think this would or could work.  You know, if I had a husband that finished home improvement projects.  

The progress was slooooooow!

Did I mention sloooooooooow?


By this point my husband was starting to get cocky.  He was walking around with a sense of accomplishment.  He was shunning the non-believers.  The neighbors were standing out front saying things like, "I had faith in him all along." and "That Dave sure is a stand up guy." 


Remember when I said my husband was crazy and I was really mad at him and I just about hired a lawyer?  Ok I didn't say all of that but I sure thought it.  Now I just love my new pool house!  Isn't it great to go green?!  

My backyard is pretty much complete thanks to that great man!  


Nydia 8)

Wednesday, May 30, 2012

A Book Club And Hunger Games Party


Hi there folks!  Now, I know it’s been a while but I have an excuse!  If you’ve been following me since the beginning, by now you have collected some facts about my life.  These facts include, but are not limited to, my phobic fear of maggots, my special education teaching background, my travel baseball team playing son, my soon to be in college daughter, my husband’s dog –which by the way just passed away and left me completely and utterly heartbroken, and last but certainly not least, the pursuit of my master’s degree!  Needless to say, I have my hands full!!! So while I have absolutely continued making things, I’ve completely put the blog on a back burner.  Could you blame a girl? 

Full disclosure here though, during this hiatus I have started a book club!  Gah!  I’m so excited about it and it’s been soooo much fun!  Our first book was The Hunger Games.  We did all three books in the series and met twice to discuss them.  It was a really fun read and everyone in the group enjoyed it.  Our last book club meeting included décor and food inspired by the book. I even threw in a parting gift!  The parting gift that I made is what I’ll be featuring today. 

So I wanted my book club members to leave with a token of thanks for participating and I wanted it to be personalized.  This is what I was able to come up with. 

They say Book Club on them.


I found these solid mugs at the local dollar store.  They looked sturdy and were cheap enough that I could afford to pick up a few without busting the budget. 

Aren't they sturdy looking?!  Jeesh, they were heavy too!

So, basically there's no genius secret behind this.  All I did was make a template using vinyl and my handy dandy Silhouette machine.  

Over this template I spread a thin layer of glass etching cream.  I cleaned it off and tada instant thoughtful book club hostess gift.  

BY THE WAY... Here's my Book Club party!

Notice the sleep serum, Prim's goat cheese, nightlock berries, and District 11 rolls.  

Did you catch the bread and medicine parachutes? 

Notice the arrow through the apple and the game maker's pig roast.  

We took care to make a sushi memorial for Finnick Odair.  

Check out the Mocking Jay cake my friend Dana made!

We also included President Snow's white roses, Haymitch's wine, and Effie's bowl.  The banner idea came from here


So folks, there you have it.  I haven't quit making things.  I'm just one very busy bee!  

Nydia 8)


Saturday, March 24, 2012

Make Your Own Newborn Baby Shoes


Do you want to look like a rock star at the next baby shower you attend?  Do you want your little princess to make all the other baby girls spit up with envy?  Check these out!  Aren't they as sweet as Nutella? My sister came over last night and showed me how to put these sweeties together.  The following is a tutorial with so many pictures that your head will spin!  


These are what they look like finished.  Trust me the pictures don't do them justice.  

This is what you will need.

Make four sole templates out of cardboard.  

Cut out four pieces of fabric large enough for at least a half inch overlap all the way around the cardboard templates. 

To make the box braid ribbon start with two tied ribbons.  We used plain white and another combination of pink and white.  

Make a loop with the white ribbon.  Make a loop with the pink ribbon.  Put the pink ribbon loop through the white ribbon loop and tighten the white ribbon.  Now you will hold a pink ribbon loop.  Make a white loop and put it through the pink loop. Tighten after each loop insertion. Keep doing this until you have the desired length.  


Place the template over the piece of fabric.

Using a glue gun, glue all the seams over to cover the template. 

This is what you'll end up with.

If you turn it over, it will look like this.  Much neater!  You will need two of these.  

Now to the other half.  Take the other template and glue down the middle like the picture. 

Place the stuffing over the glue.  Sorry about the picture quality.  These were done at night. 

You will then drape your fabric piece over the stuffing and turn it over for glue.

Glue all the edges over like this.  

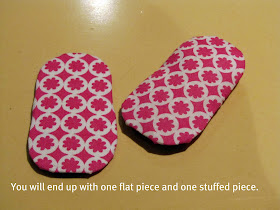
These are the unstuffed piece and the stuffed piece together.  Remember you will need to make two of each for each shoe.  

Take one of your box braid ribbons and place it over the stuffed shoe template piece. You will glue under to attach it.  

This is the underside view.  Be sure to add two small ribbon loops to each side. 


You are now ready to sandwich the two pieces together.  You will take the unstuffed fabric covered template and glue it over the underside of the stuffed one.  Do this matching up the unfinished sides.  This will give your shoes a finished look.  

Use the box ribbon to cover the seams of the sandwiched pieces.  You will glue this all the way around and finish the ribbon in the back.  Don't worry if it's not perfect.  We just added a flower to cover any uneven seams. 

Add accent flowers and lacing ribbon and you have yourself a super cute pair of baby shoes!  


I hope you try your hand at these, but keep in mind that these can be a chocking hazard.  My sister is my hero for teaching me how to create these cuties!  Thanks sis.  

Nydia 8)